You have no items in your cart.
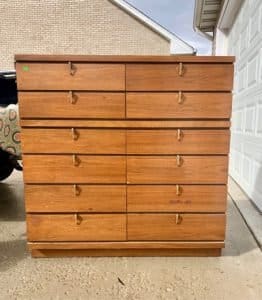
My Friend Beth had alerted me to a couple of nightstands that were for sale at our local Habitat for Humanity store. They were super cute in the picture online, so I decided to go look at them. When I got there, they were in rougher shape than I had anticipated. Bummer. But I feel like we are lead somewhere for a reason. I spotted this amazing 12 drawer mid-century modern chest. I studied it for awhile and decided to leave it there. For the next day, I could not get it off my mind! I went back to purchase it and it was half off day! Whoop! Whoop!
This post contains affiliate links. You don’t pay any more from ordering from these links but I earn a small commission so I can continue to bring you more fun projects! They also allow me to show you exactly what I use so you know what I’m referring to!!
Material List:
- Orbit Sander
- White Lightening Cleaner
- Slick Stick Primer
- Sponge roller
- Pine Cone
- Mud Puddle
- Sandbar
- Fluff
- Peacock
- Yankee blue
- Haint blue
- Kudzu
- In the Navy
- Clear Satin
- Gator Hide
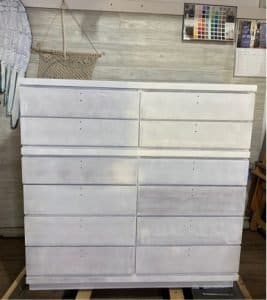
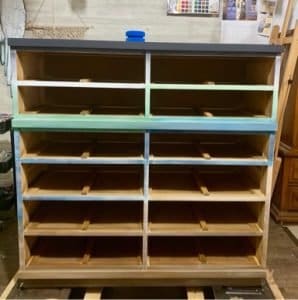
To start, I have to tell you I have the most amazing sister-in-law! She came over and prepped this piece with me. Since this is a mid-century modern piece, she started by sanding the whole thing with an orbit sander to rub the shine off. Then, we gave it 2 coats of Slick Stick with a sponge roller. I like to use the sponge roller on flat pieces like this because it is easier to get a smooth finish. We used Slick Stick because it is made to help adhere paint to slick surfaces such as countertops, glass, and glossy surfaces and Mid Century Modern pieces tend to have a slick glossy finish.
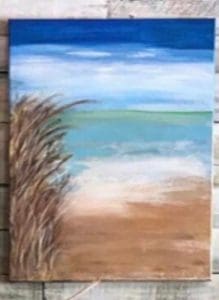
Now it was time for the beach scene! My client had sent me this photo. She wanted the layout of the colors without the grass.
I started with the color Pine Cone from Dixie Belle for the sand. I blended Fluff in next and dry brushed the fluff back into the Pine Cone for a layered look. Next I blended Peacock and Yankee Blue together for the water. I added Kudzu above that and then went back with Fluff. At the very top, I started to fade in some In The Navy. The key to getting a blended layered look like this is to use your brighter colors for your first coat and your lighter colors for the second coat.
After the first coat of colors was laid on, I used the color Mud Puddle and Sandbar on the “sand” to get an even more layered effect. Using different but similar shades helps to create a layered look. For the water, I painted Haint Blue over the top. I also did a lot of dry brushing with Fluff (white) to create a cohesive look throughout the whole front of the piece. I did use a little bit of water with my spray mister, but for the most part, I kept my brushes dry.
A couple of tips for blending are to have several brushes handy. I use anywhere from 2-8 brushes when I paint looks like this. I keep a jar of water next to me and drop my brush in when I’m done to keep the paint from drying on.
When I liked the way it looked I took all the drawers out and blended them to fade into the look. This is the part where I used a lot of Fluff to get it to come together. I filled in any areas that I missed when I was painting the art on the front, and then dry brushed white over it. It looked like this.
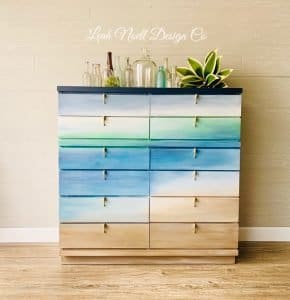
My favorite tip for painting an artsier piece is to keep the art on the front and the sides simple. I used a solid coat of In the Navy for the top and then ombre’d the sides with In the Navy and Fluff.
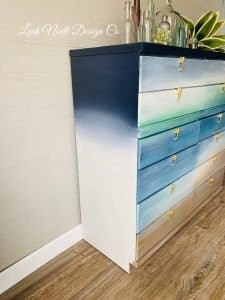
I’m very happy with how it turned out and my client is too! To protect the piece, I gave it 2 coats of clear satin all over and then an extra 2 coats of Gator Hide on the top! Gator Hide is water-repellent and heat-resistant so it is perfect for the top! Here she is ready for her beach home on Lake Michigan!