You have no items in your cart.
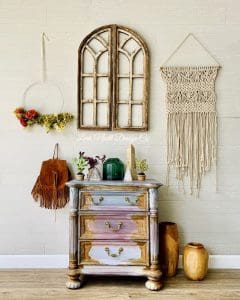
Ohh that bohemian vibe has gotten ahold of the design world! I seriously couldn’t be happier about it. The boho style is so colorful and versatile. Hand painted finishes can really transform a room and give it a rich, authentic vibe.
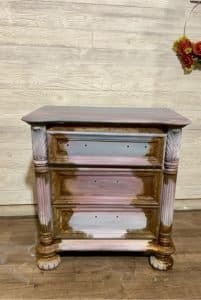
This little chest is a dream piece. It’s small enough to be a nightstand, but has 3 drawers so it’s a perfect storage solution if you have a small space.
This post contains affiliate links. You don’t pay any more from ordering from these links but I earn a small commission so I can continue to bring you more fun projects! They also allow me to show you exactly what I use so you know what I’m referring to!!
Material List:
- White Lightening Cleaner from Dixie Belle
- BOSS Primer in Clear
- Flat Large Brush
- Oval Round Brush
- Stormy Seas
- Muscatine Wine
- Savannah Mist
- Fluff
- Iron Patina
- Green Activator Spray
- Best Dang Wax in White
- Dixie Belle Clear Satin Top Coat
- Gator hide
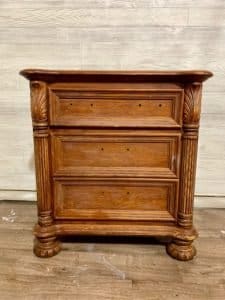
I started off by cleaning this piece really good with White Lighting Cleaner. I mix up about a tablespoon with hot water in my spray bottle and use it to clean all my furniture transformations. It’s very inexpensive and works really well. After I cleaned it, I rinsed it with water. You always want to rinse your cleaner off your furniture for proper adhesion.
The next step is priming! I primed this piece with BOSS clear primer. Well, as you can see here I had my brother prime this piece. We hang out every Wednesday and sometimes if he’s in a helpful mood, he’ll help me prep furniture. If you know him be sure to tell him you saw him on this blog. It will make his day and he’ll want to help me more!! I used clear primer because I wanted to see some of the wood coming through.

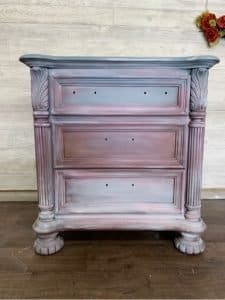
After the primer was dry it was time to blend the boho style paint finish. I choose Stormy Seas, Muscatine Wine, Savannah Mist, and Fluff. I wanted a blended color blocked look so I started with the Stormy Seas on top, moved into the Muscatine Wine in the middle, and ended with Savannah Mist on the bottom. I love how beautifully they complimented each other.
As I blended, I dry brushed each color over each other to create layers. I dry brushed Fluff heavily over the Savannah Mist on the bottom and then carried it through the whole piece. It turned out gorgeous! I love the way Dixie Belle Paint blends so smoothly together. I could have stopped here and have been happy, but this piece kept saying “Give me More.”
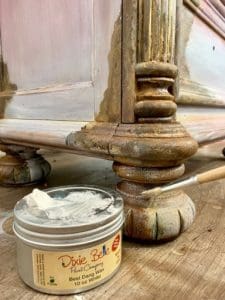
After the chalk paint is dry it is time to add the Iron Patina Paint. When using metal effects paint on furniture it is important to have a base of chalk paint underneath. This works as a second primer and yields better results.
For this piece I choose to use Iron Patina Paint from Dixie Belle. Iron is my favorite from the patina line because it gives you various shades of brown with a light texture that is hard to mimic with paint. This stuff is so fun and so easy. Make sure you stir your paint really well. This paint has metal particles in it that fall to the bottom. You really want to stir it well. Then I like to take a brush and steeple or dab it in the areas I want it. Applying it in this way creates a light texture. This is where you will feel like the artist you are. Let it flow. I like to apply it around the drawer frames and on the edges best.
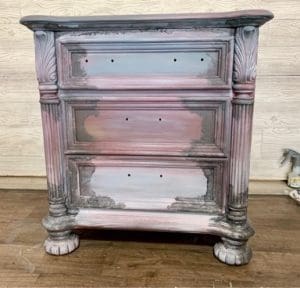
As you can see it is gray! Let this dry completely for about an hour depending on humidity. Once it’s dry it’s time to get that rust activator ready! I like to take the drawers out to apply this to minimize drips. This is the part that makes everything work. You want to apply the rust patina paint on the same gray areas you previously added the rust paint. While it’s still WET, spray it with the GREEN activator spray. Make sure you are using the green activator spray from Dixie Belle. The Blue doesn’t work as well. You can also put it into a bowl and apply it with a sponge or chip brush for more control. Here is a picture of it after about an hour after applying.
And here it is after about 15 hours. See the difference? Time is your friend with rust patina!!
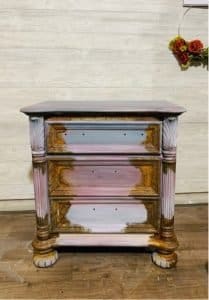
To finish this look I added white wax from Dixie Belle over the rust to soften the look. Dixie Belle Wax is water based so you can actually use their sealer over it. This isn’t the case with most other brands. Usually the rule is sealer (polycyclic) then wax. That’s why I love Dixie Belle. The white wax was able to grip right onto the rust and soften it perfectly.
After the wax was dry, I sealed the whole piece with Satin Clear coat. You want to be sure to seal your rust to stop the activation process. I added an additional 2 coats of Gator Hide on the top for extra protection. Gator Hide is Water repellant and heat resistant so it is perfect for this nightstand! I also updated the hardware. You can read about how to update hardware here.
I just love how she turned out! This piece is available! You can view it here.