You have no items in your cart.
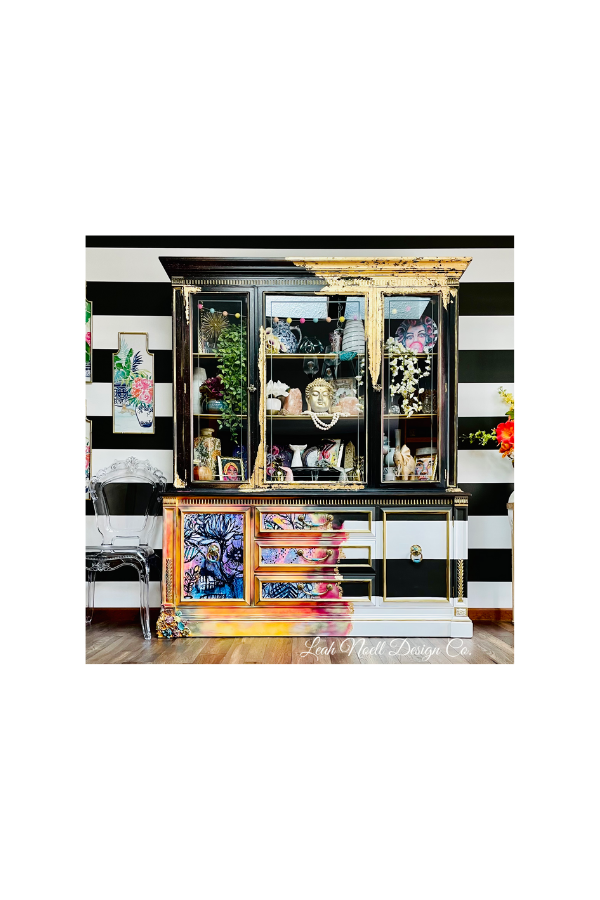
Ohh goodness I’m so excited to finally show this piece off  ! It’s been years since I have taken a custom job like this, but I loved my client’s vision so much I just couldn’t say no! I decided to take just a couple customs this summer from clients who have purchased from me in the past. Although my custom schedule is closed now, This is the reason why I open it from time to time. I love collaborating with someone to make their vision come true within my own unique way & style!
This post contains affiliate links. You don’t pay any more from ordering from these links but I earn a small commission so I can continue to bring you more fun projects! They also allow me to show you exactly what I use so you know what I’m referring to!
Material List:
- White Lightning Cleaner
- BOSS Primer in white
- Silk Mineral Paint in Saltwater
- Silk Mineral Paint in Anchor
- Gold Leaf
- Frog Tape
- Gold Leaf Adhesive
- Gloss Clear Coat
- Big Mamma’s Butta for the inside
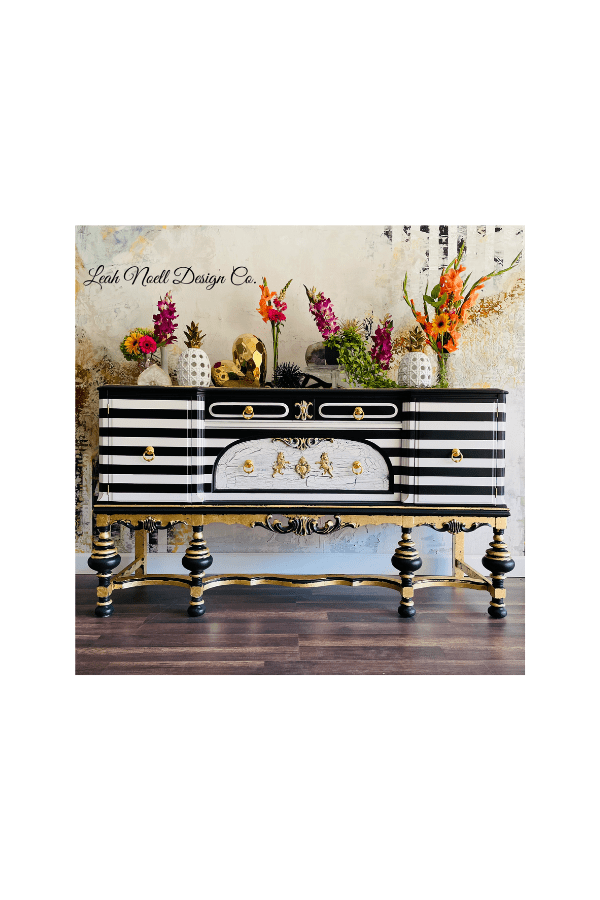
I Love black and white stripes. I always have! I remember back in Cosmetology school when one of my friends let me borrow her black and white stripped shirt and I felt amazing in it. Back then we didn’t have Amazon and couldn’t really order whatever we wanted. We were limited to store selections. I’m grateful that isn’t the case anymore!
I have black and white stripes as a staple decor pattern in my home. In fact my client said this wall is what inspired her to go for this look on her buffet. She was impressed with the crisp lines of the wall.
Here is the before for this buffet! It is actually really pretty but it was time for a change. I couldn’t tell if this piece had wax on it or not and still don’t know! I assume it did because my white lighting (a water based cleaning mix) kept bubbling up when I applied it which is a sure sign of wax being present. I knew I would be using painters tape on this and my fear was that if the base was wax, they paint and the tape wouldn’t preform right. So I took the following steps.
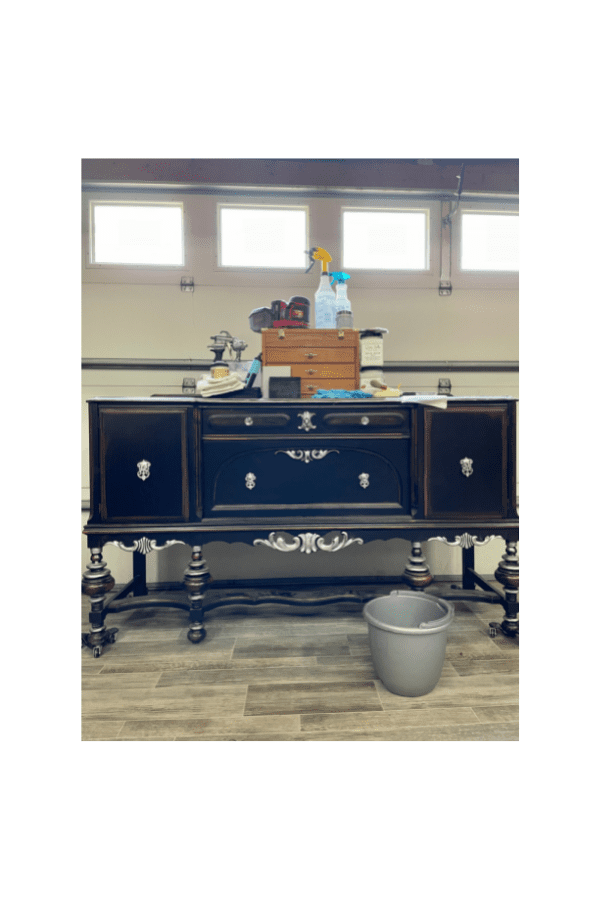
Removing Wax from an Existing Finish
1. I cleaned this piece with White Lighting according to my usual directions. Clean Well & Rinse well. Let dry.
2. Then I scuff sanded it. I still wasn’t sure if the wax was present. This piece was painted 10 years ago so if it was wax it was fully cured and probably wouldn’t case an issue but I didn’t want to chance it so I took more precautions.
3. I scrubbed it with mineral spirits and a green scrubby pad. This helps break down the wax. It is kind of an oily mess to deal with mineral spirits.
4. I cleaned it again with White Lightening to remove all the mineral spirits. Then I rinsed it well and dried it.
5. I wiped it down with denatured alcohol which is overkill on the prep but seriously guys….I did NOT want adhesion issues to arise after taping this piece off. I always think overkill on prep work is worth it! no one wants to deal with issues during the finishing process.
Then I went into priming. My client originally asked for stripes across the whole buffet and solid gold leaf from the legs to the bottom of the buffet. When I work with a client on design, I ask for lots of photos and descriptions and then ask them to let me work my magic without limitations! I only work with clients that understand that I have to be able to use my artistic vision and what I think is right for the piece. The more I feel freedom to do as I choose, the better it turns out.
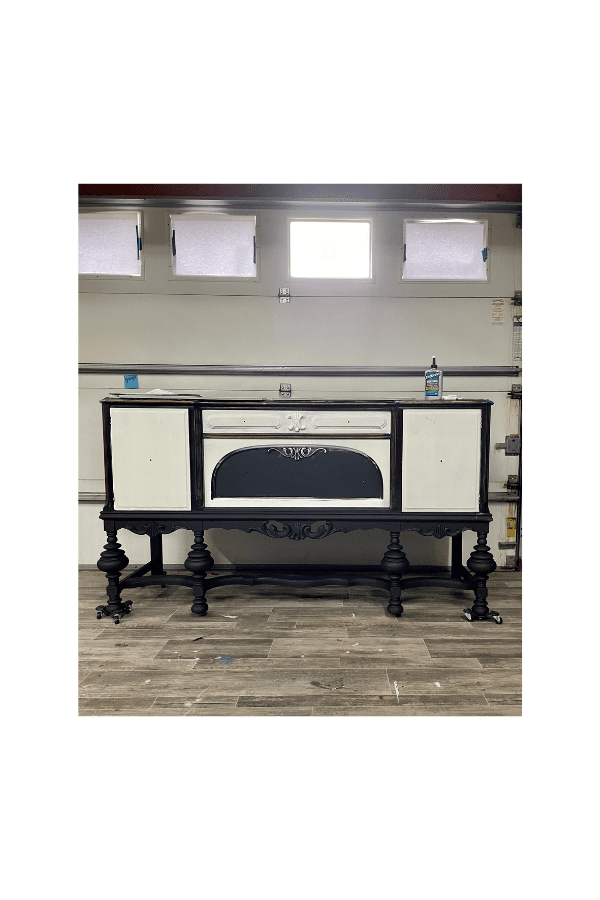
As you can see here I primed some of the top in BOSS white. I had intended on leaving the edges black but then changed my mind. I didn’t use a primer on the top part where you see the black and I didn’t have any adhesion issues. I also didn’t prime the bottom before I applied the silk paint in Anchor because there was no need. After this, I painted the whole top in Saltwater expect that black drawer front.
Here’s the funny thing, I have an artist’s brain and taping and measuring this amount of stripes is not my thing! I woke up at 3am on my 13th wedding anniversary to give it a coat of Saltwater (white). I put a fan on it and got up again at 4:30 to apply another coat. When we work up Sunday morning I asked my husband Curt if he would measure and tape these stripes for me. How could he say no on our anniversary? That’s marriage for you! Honestly he is so good about this. All of my pieces that have a lot of black and white stripes on them, he measures and tapes. I do small amounts but when it requires a tape measure or wraps around the side you know he’s involved! We had coffee and enjoyed the morning together.
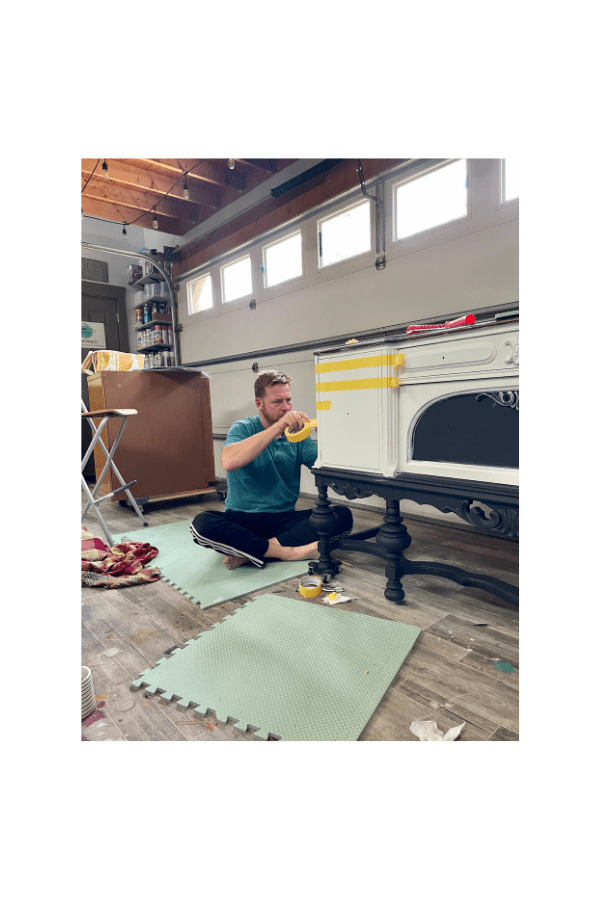
Once the buffet was fully taped I went into the same process I always do. I’m going to number these instructions to make it easier to follow. It’s super simple and yields great results!
How to Get Crisp Stripes
1. After your tape is on, push in on hard. Make sure it is adhered well. Use Frog Tape for best results. I like the yellow for delicate freshly painted surfaces because this all happened within a few hours.
2. Paint over your tape with the SAME color that is under the tape. Here I painted white over white. Why do this extra step? Because this is what makes the lines crisp. If your tape bleeds it is most likely to happen when the first coat of paint is applied. That is why your first coat over the tape should match the tape underneath. —Okay so advanced step. What if you blended your paint finish and want to apply crisp striped over it? You can use a clear topcoat for the same result!! Easy right!!
3. Apply your black. I used Anchor.
4. I only needed 2 coats of Anchor for solid coverage. On the second coat, while the paint was still wet I removed my tape immediately. The tape is soft from the paint being wet and makes it easier to remove.
5. Touch up with an artist brush as needed. Even with this process there is still some spots, especially on the edges that need to be touched up. so do so!!
After the stripes were on I had to make some design decisions. These types of decisions happen over a few days. A lot of looking and thinking goes into this process. I started to slowly apply the gold leaf to the legs. At this point I wasn’t sure if the legs would look good in solid gold leaf so I applied it leaving the areas you see in the finished photo black. It was the right choice! I find it easier to add more later if you want more but you can paint over gold leaf if you don’t like it. Just sand it back a bit.
For some reason I was called to use crackle on the center. This isn’t a product I pull out often but it just seemed to be the most perfect fit for this piece. It was the right amount of texture to pull this clean look together!
Even though the silk paint doesn’t need to be top coated, the metal leaf does! It will tarnish over time if you don’t topcoat. I also wanted to give this buffet a glossy finish! I brought it into my spray booth and gave it about 3-4 total coats of clear Coat gloss. I can’t remember exactly how many but they were thin and I sprayed it every hour or so until it was done.
My client was very happy! If this wasn’t a custom I would be tempted to keep it! I’m so grateful I had the opportunity to do a piece like this!