You have no items in your cart.
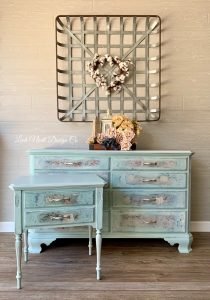
Ahh dressers…something we all must have, right?? I found this Ethan Allen dresser at a thrift store I often go to. What first caught my eye was the little side table first that matches this piece. I then saw the dresser. To tell you the truth this is not the style of furniture I typically buy. It had awful bat wing hardware and is a very simple style. Although, simplicity allows more room for creativity which is exactly why this piece was perfect for this design!
This post contains affiliate links. You don’t pay any more from ordering from these links, but I earn a credit when you order from them. This helps me bring you more fun projects and tutorials!
Material List:
- Krud Kutter Gloss Off
- Boss Primer in White
- Dixie Mud
- Sea Glass
- Yankee Blue
- Sea Spray Texture
- Rustic Mixed Teal Transfer (I used 2 packs)
- White Wash Glaze
- White Wax
- Satin Clear Coat
- Gator Hide
- Car Wash Sponge
- chip brush
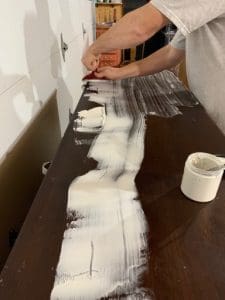
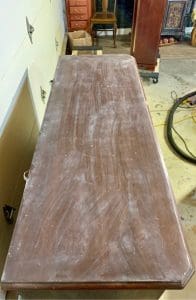
To start off I have to give credit where it is due! My husband works construction so when it is -21 out (Seriously it was -21 in Chicago this January) or other bad weather he graciously helps me prep furniture. This dresser was in great condition but it still needed all the scratches filled, hardware holes filled, cleaned, and primed. I love having him in the shop because he thinks of ways to do things that I NEVER would have thought of. Here is today’s example. To make the top super smooth he first cleaned it with Krud Kutter Gloss off. Then he took Dixie Mud and spread it all over the top with a large spatula. This filled every stinking scratch there was! We let it dry then sanded to top smooth with an orbit sander. You can see the process here:
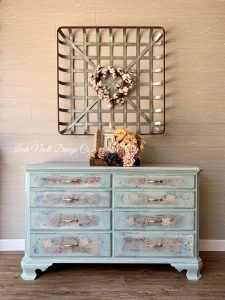
To give this piece a more updated look, we decided to ditch the bat wing hardware and bring each drawer down to one pull vs two pulls. We filled all the hardware holes with Dixie Mud. After a good cleaning with Krud Kutter this piece was primed with Dixie Belle BOSS primer in white. This is a great primer because it blocks any stains from coming through and also gives the surface a little grip for the paint to stick to.
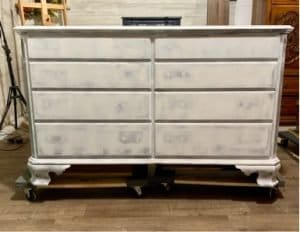
Once dry, I gave this girl a base coat of Drop Cloth. Now, my original plan was to have the shell in Drop Cloth and the drawers in Sea Glass. Once executed, I changed my mind and painted the whole piece in Sea Glass.
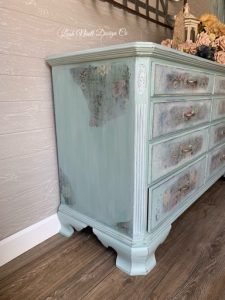
I wanted to create a worn floral look. So I cut up pieces of Prima Re Designs Rustic Teal transfer and added it to the drawer centers. Once attached, I sanded them “into” the paint. I did this lightly as they distress easily. This is a great techinque to get some milage out of your transfers!

After that I mixed an 8oz paint in Yankee Blue with 2 scoops of Sea Spray texture from Dixie Belle. The consistency you’re trying to achieve is a thick, brownie batter-like consistency. I applied it with a chip brush around the edges of the drawers and around the floral transfer.
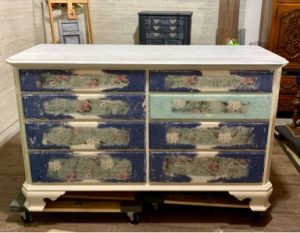
You can see from these photos I’m always one drawer ahead! After the Sea Spray Texture is dry, you can paint over it with another color! I choose Sea Glass. I wanted to just lightly see the Yankee Blue underneath so after the Sea Glass was dry I sanded it back to see the Yankee Blue. This also helped created a more worn and distressed look. I added a little bit of white wax to make the transfer and sea spray texture blend a little more together.
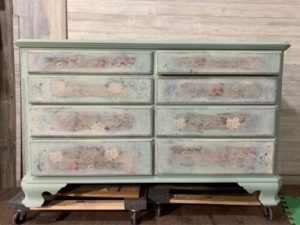
As you can see here, it looks like the flowers were painted on years ago and the paint is coming off so you can start to see the under layer again. I just love this look! I went ahead and finished painting the whole shell in Sea Glass at this point. For the final details I decided that the Sea Glass was too bright to go with the worn look of the drawers. After distressing the edges,I used a cut up car wash sponge to add white wash glaze to the whole piece to give it more of a washed and worn look as well. To make this paint finish last I sealed the entire piece with Satin clear Coat. Once this was dry I applied 2 coats of Gator Hide to the top for extra durability. Here is the final product! This piece is available for purchase on our shop page! What room would use this set in?