You have no items in your cart.
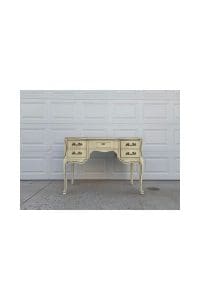
Isn’t this mermaid inspired vanity just the cutest? My sister-in-law, Carrie, found this at our local Goodwill for only TEN dollars! This was a big time rare score! When she sent me the picture I immediately knew I wanted to paint it. I mean check out the before picture. It IS cute, but was in dire need of some jazzing up.
This post contains affiliate links. You don’t pay any more from ordering from these links but I earn a small commission so I can continue to bring you more fun projects! They also allow me to show you exactly what I use so you know what I’m referring to!
Material List:
- White Lightning Cleaner
- BOSS Primer in white
- Wagner Sprayer
- Mermaid Tail Chalk Mineral Paint
- Caribbean Metallic Paint
- Deep Woods Metallic Paint
- Gold Digger Metallic Paint
- Gator Hide
- Dixie Belle Mini Synthetic Brush
To begin, I always start with the prep work! I cleaned this piece throughly with my White Lightening cleaner. After it was clean, I rinsed it off. Dixie Belle just came out with these new Wagner Sprayers, so I thought this would be the perfect time to try it out! Now, I always prime my furniture. You don’t have to use a primer with Dixie Belle paint, but I love that they have a primer that is super compatible with their paint for those of us to choose to prime. Want to see how to use a Wagner Sprayer? You can see the video here. I will warn you at the end of the video. my camera fell over, but it is still a good demonstration of how to use the new sprayer! I love it– it’s just so easy to use!
Next, I sprayed the inside of the vanity with gold spray paint. This was just the easiest way for me to paint the inside! Then I gave the entire piece a coat of Mermaid Tail paint. I knew I wanted to use the new Caribbean metallic paint. The metallics work best when you have a matching or complimentary color of Dixie Belle Chalk paint underneath. I used 2 coats of Mermaid Tail, letting them dry in between. You could use your sprayer for this, but I did it by hand with a good synthetic brush because the weather was bad and I couldn’t pull my piece out to spray it.
Next, I painted the whole piece by hand with Dixie Belle’s Caribbean. I used my spray mister a little bit to keep my paint wet for longer periods of time when necessary. I used 3 coats total for good coverage. Now one of the questions I keep seeing is, how do you keep the metallic paint from looking streaky? I truly believe the brush you use is super important. I love the Mini brush from Dixie Belle. It is the softest synthetic brush I’ve ever used and makes a difference in my paint finish. It’s also important to note since we are coming out of summer, if you’re working in super hot environments, your paint will dry differently than if you are working in a temperature controlled environment. So if it’s hot where you live, you may want to paint in the mornings or evening in your garage when the temperature is a little more favorable to a good paint finish. I also don’t strive for absolute perfection. I always try for a good, even finish, but if you are seeking perfection, you’re going to be let down with a hand painted finish–we’re all only human, after all! As you can see here, the top has a nice even finish but it’s not perfect and that’s okay!!

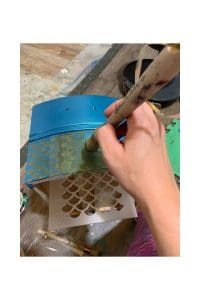
Next, it was time to choose the scales for the drawer fronts. I originally wanted to decoupage scales on the front, but when the paper came in it was (no pun intended) not to scale with my project. I decided to order this scale stencil to use for the mermaid details instead. I did cut it several times throughout the process to make it fit my space. I dapped on Deep Woods and Gold Digger with my stencil brush.
Once the whole piece was completed, I sealed only the top and the drawer fronts with Gator Hide for extra protection. Luckily, this didn’t effect the look of the metallic at all! I painted the hardware with the same spray paint I used on the interior for a nice, cohesive look. If you want to learn how to paint hardware for a lasting finish, you can read this blog post! For the final details, I highlighted all the edges with eternal gold decor wax from Prima! I’m super excited to see this in my niece’s bedroom!